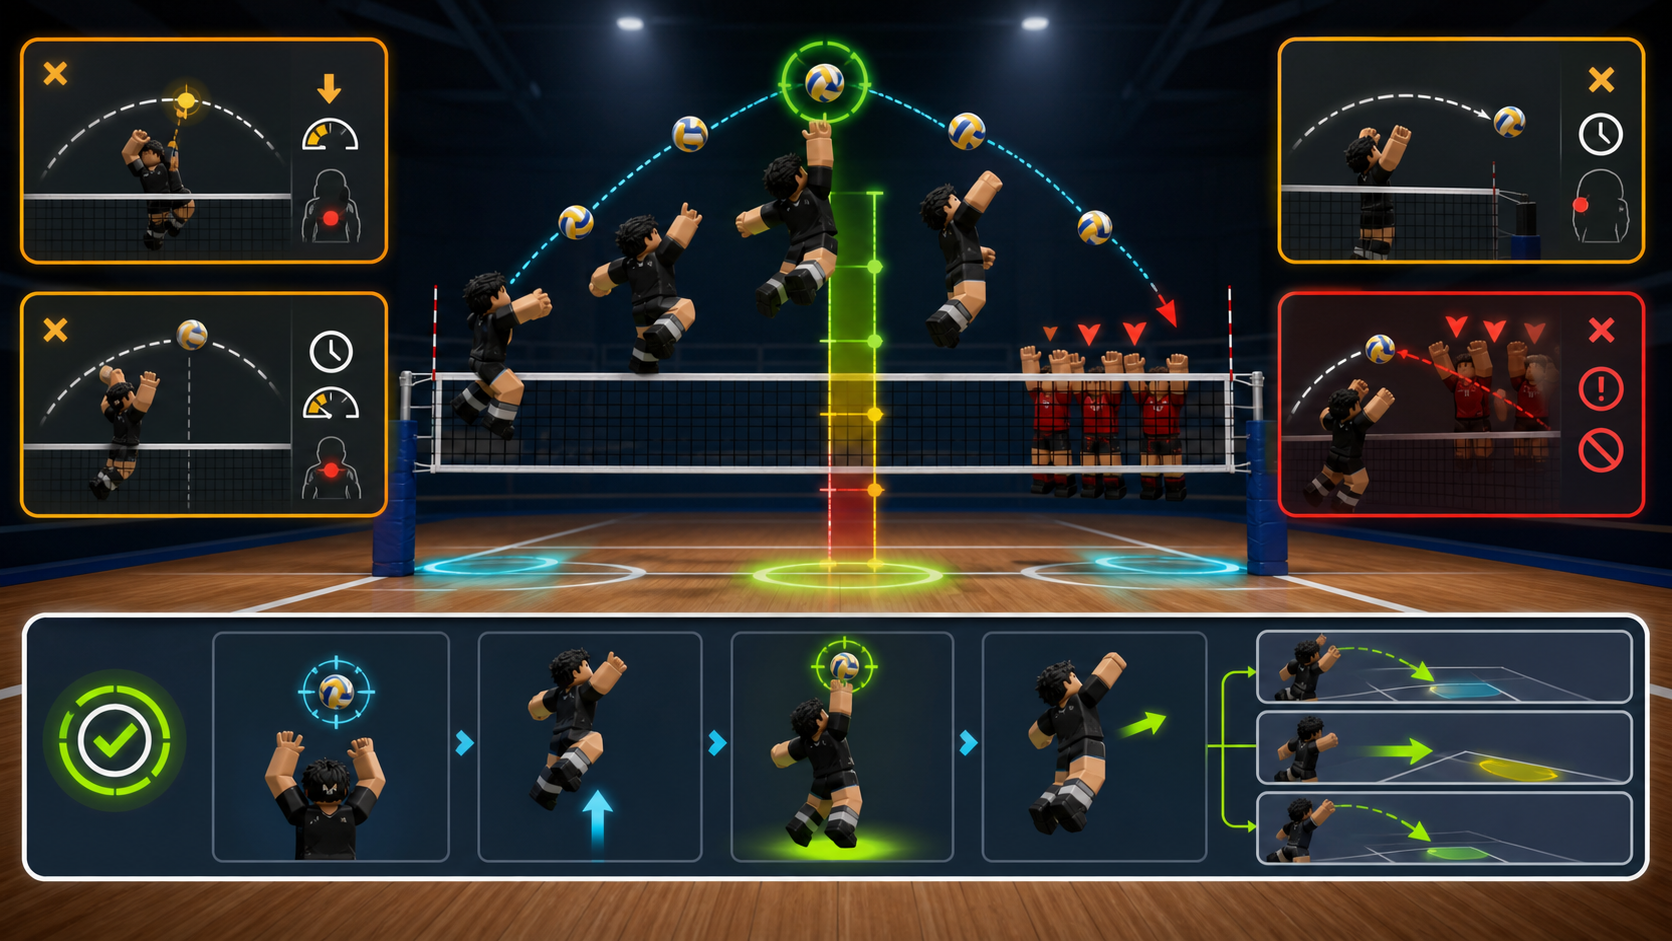
Spike Timing Contact Snapshot
This June 3 spike timing note is a hands-on note for keeping the mechanics page practical. Use it as a self-review board after a missed attack: contact height first, jump timing second, tilt decision third, and blocker lane last.
| Check | What to review | First fix |
|---|---|---|
| low contact check | The ball is hit below useful net height or forward tilt pushes the path down. | Remove tilt and wait for a cleaner above-net contact before judging the style. |
| early jump check | The jump starts before the set reaches a playable attack window. | Delay the jump slightly and count only neutral spikes that land in bounds. |
| late contact check | The attacker reaches after the ball drops or camera movement pulls the touch late. | Stabilize camera and ask for a higher set before adding aim variation. |
| blocked lane check | The blocker reads the same straight hit or tilt direction every swing. | Keep contact rhythm, then choose side, forward, or back tilt late instead of early. |
Official Control Baseline
The official Volleyball Legends Roblox description gives the baseline action: Bump / Spike in midair uses Left Click on PC and RT on console. The same description says tilt can change ball direction after a serve or spike. Fandom's control table repeats the same PC and console action mapping, so this page treats the input map as a stable starting point and keeps advanced advice separate from official facts.
That distinction matters for search quality. A player who asks how to spike usually does not need another tier list first. They need to know whether the miss was contact height, jump rhythm, tilt choice, blocker read, or account kit. The helper above uses those self-reported symptoms and does not connect to Roblox.
Too Low Fix Matrix
Use this table before changing styles. If the spike is too low, the safest first fix is almost always higher contact and fewer direction variables.
| Miss pattern | Likely cause | Practice fix |
|---|---|---|
| Too low after forward tilt | The hit path is being pushed down before the ball clears the net. | Remove forward tilt, wait for above the net contact, then add direction later. |
| Too low even with no tilt | The jump starts before the set reaches a playable height. | Ask for a higher set, delay the jump slightly, and count only clean neutral spikes. |
| Blocked every time | The blocker can read the same line before the hit starts. | Keep the jump rhythm, then change final aim late with a side tilt or safer deep hit. |
| Spike goes out | The target is too sharp or back tilt is overused from a high set. | Aim middle-third first, then reopen sideline shots after three in-bounds contacts. |
Tilt Decision Table
Tilt should be a decision, not a panic input. Start with no tilt until the contact point is stable, then add the smallest direction change that solves the current defensive read.
| Tilt choice | Best use | Main risk |
|---|---|---|
| No tilt | Best first drill for new players and too-low fixes. | Predictable if repeated after defenders adjust. |
| Forward tilt | Fast lower path when close enough to the net. | Common too-low trigger when used too early or from the back court. |
| Side tilt | Lane change against a blocker who is sitting on the straight hit. | Can become readable if every swing uses the same side. |
| Back tilt | Extra height or deeper safe ball when contact is low. | Can float out if the set is already high and the target is too deep. |
Practice Route After A Clean Spike
After neutral contact lands in bounds, move one step deeper instead of rerolling immediately. Use the controls guide to recheck inputs, the serve practice timer for rhythm, the role picker for player identity, the styles tier list and abilities tier list for kit checks, the Sanu guide for tilt-heavy spiker decisions, the Feiko guide for setter timing, the combo builder for attack routes, and the ranked guide only after the mechanic is repeatable.
This page is not an official timing simulator. It avoids fake hitbox, input automation, and hidden win-rate claims so the guide stays useful for normal Roblox play and advertising review.
Editorial Status
This page is maintained as an independent Volleyball Legends guide. Review notes are visible so players and search engines can separate checked guidance from official game updates.
Route Chain
Follow one same-category page or one cross-category side jump before returning to search. Each link has a reason so the path stays useful instead of becoming a generic related-post block.
Fast Answer
To spike in Volleyball Legends, jump into a playable set and use the same hit action listed for bumping or midair spiking: Left Click on PC or RT on console. The safe beginner rule is to hit when the ball is above the net, start with a neutral spike, then add tilt only after contact timing feels repeatable.
Official Control Baseline
The official Roblox game description lists Bump / Spike in midair on Left Click for PC and RT for console. This page uses that as the baseline, then adds practice routing for common player problems such as too-low hits, blocked swings, out balls, and readable tilt habits.
Spike Search Route
Spike Search Route turns common attack searches into one useful next page instead of another generic tier list. Pick the phrase that matches the miss, then stop when the route explains whether the problem is contact timing, set quality, lane choice, build fit, or source confidence.
| Search phrase | Likely problem | Open first | Stop condition |
|---|---|---|---|
| how to spike in Volleyball Legends | The player needs the official midair hit input and a simple first contact rule. | controls guide, timing timer, practice drills | Stop adding tilt until neutral contact lands in bounds. |
| Volleyball Legends spike too low | The jump, set height, camera, or forward tilt is making contact below a useful attack point. | too-low fix, set guide, best settings | Stop blaming the style until the ball is above the net at contact. |
| Sanu spike route | The player wants tilt-heavy pressure but may be using the style before the base hit is stable. | Sanu profile, Sanu guide, style comparison | Stop chasing Secret-style pressure if the same no-tilt spike still misses. |
| ranked spike keeps getting blocked | The attack lane is predictable, the set is slow, or teammates are not forcing blockers to move. | ranked guide, team rotation, receive guide | Stop queuing if every attack uses the same lane into the same blocker. |
| post-code attack build | Fresh code rewards made the player want a stronger spiker build before testing match evidence. | spin value, pity tracker, source policy | Stop spending if the attack problem has not repeated across three readable matches. |
Spike Location Search Route
Spike location is a read, not a hidden landing preview. Use set height, jump contact, hitter angle, blocker lane, and visible hit indicator cues to judge where the ball is likely to go. Current Update 73 context says hit indicator feedback was improved around court, wall, ground, and impact feedback, so use it for practice review rather than treating it as private hitbox data.
| Search entry | Answer first | Retained action | Open next |
|---|---|---|---|
| where will my spike land? | Read set height, contact point, approach direction, and blocker lane before adding tilt. | Practice neutral contact before chasing angles. | practice drills and too-low fix |
| hit indicator cue | Use the indicator as feedback after contact, not as a hidden aim assist. | Review court, wall, ground, and impact feedback in practice mode. | practice bots and best settings |
| too-low spike | If the spike location is always low or short, the contact window is the first fix. | Raise contact before changing style, ability, or tilt. | too-low fix and controls |
| practice bot read | If bots receive spikes better, use them to see whether the attack is readable or mistimed. | Run three balls against bots before ranked. | practice bots and ranked guide |
| reroll stop | Do not reroll because one spike landed wrong. | Check contact, set, and lane evidence before blaming Sanu, another spiker style, or an ability. | style comparison, ability comparison, and spin value |
Spike Location Three-Ball Check
Do not reroll because one spike landed wrong. Review three spike attempts before changing the build. Ball one should confirm set height, ball two should confirm contact above the net, and ball three should confirm whether the hit indicator shows the same court, wall, ground, or impact feedback pattern.
- Ball 1: record whether the set gave enough height for a clean swing.
- Ball 2: record whether contact happened above the net before tilt.
- Ball 3: record whether the location problem repeated with the same lane or indicator cue.
If two of three balls share the same miss, practice that mechanic. If the miss changes every time, stabilize camera and settings before comparing styles or abilities.
Contact Timing Ladder
Contact Timing Ladder is the safest practice order when a spike feels random. Climb one rung at a time; if a lower rung fails, do not skip ahead to a stronger style, a harder tilt, or ranked pressure.
| Rung | Pass signal | If it fails | Route |
|---|---|---|---|
| No-tilt contact | The ball is above the net and the neutral hit lands in bounds. | Remove forward tilt, slow the jump, and repeat clean contact reps. | practice drills |
| High contact with one lane | The spike goes to one planned target instead of drifting randomly. | Name the target before the jump and use a slower set. | set guide |
| Late tilt only | Tilt changes the lane after timing is stable, not before contact. | Return to neutral swings and compare the style only after timing is readable. | style comparison |
| Ranked attack test | Three matches show the same attack result against real blockers. | Move to ranked review, team rotation, or ability fit before rerolling. | ranked guide, ability comparison |
Why Too Low Happens
Most too-low misses come from one of three choices: jumping before the set is playable, swinging while the ball is not above the net, or adding forward tilt before the basic hit is stable. Do not fix those mistakes by rerolling first; remove variables until a neutral spike lands in bounds.
Tilt Rule
Tilt is useful only when the contact point is already clean. Forward tilt can create a faster lower path, side tilt changes lanes, and back tilt can add height or depth. The page treats these as practice choices, not hidden win-rate data or a shortcut around basic timing.
Attack Lane Decision
Attack Lane Decision matters because a clean spike can still be easy to block if the lane never changes. Choose one lane before the jump, then decide whether the next rally needs a straight lane, angle lane, soft reset, or teammate setup instead of forcing the same swing.
| Lane | Use when | Main risk | Support route |
|---|---|---|---|
| straight lane | The blocker is late, the set is tight enough, and the backcourt is cheating angle. | Repeated straight hits become easy to read in ranked. | team rotation |
| angle lane | The blocker is sitting straight or the set gives room for a side target. | Over-tilting angle can send the ball out or into a waiting defender. | Sanu tilt notes |
| soft reset | The set is awkward, contact is low, or two blockers are already formed. | A weak reset gives away pressure if nobody covers the next ball. | receive guide |
| power build | Timing is stable and the account needs an ability or combo that supports attack pressure. | A damage-first ability does not fix bad set height or contact timing. | Shield Breaker, combo builder |
When To Check Styles And Abilities
After the spike lands consistently, move into role and kit decisions. Use styles, abilities, Sanu tilt notes, Feiko set timing, combo builder, and ability comparison only after the miss pattern is clear.
After Three Spike Misses
After Three Spike Misses, write down the repeated miss before touching spins. The next route should solve the visible rally problem first, then review style and ability fit only when the attack pattern is stable enough to judge.
| Review label | Use when | Do next | Open first |
|---|---|---|---|
| Stop rerolling | The same miss happens with neutral contact, no tilt, or a playable style. | Practice timing before spending the next code reward stack. | practice drills, spin value |
| Fix the set first | The ball is too low, too close to the net, or floating into a waiting block. | Repair set height and target lane before judging the spiker. | set guide, too-low fix |
| Review ability fit | Contact is clean but the build does not create pressure, lane change, or recovery value. | Compare attack abilities and save spins if pity or evidence is unclear. | ability comparison, Shield Breaker, pity tracker |
| Source check claim | A Discord, TikTok, YouTube, or comment claim says a spike build is suddenly best. | Keep patch claims dated and separate from your own three-match evidence. | source policy, latest codes |
FAQ
Why are my Volleyball Legends spikes too low?
Usually the hit is rushed, the ball is not above the net, or forward tilt is added before neutral contact is stable. Start with high no-tilt contact first.
Should I use tilt on every spike?
No. Tilt helps after timing is stable, but beginners should land neutral spikes first and add only one direction change at a time.
Does this spike helper use hidden game data?
No. It is not an official timing simulator and does not connect to Roblox. It only turns public controls and self-reported miss patterns into a practice route.
How do I see spike location in Volleyball Legends?
Use set height, contact point, approach direction, blocker lane, and hit indicator feedback after contact. This guide treats spike location as a practice read, not a hidden landing preview or private hitbox tool.
Sources And Verification
Use official sources first, then public code checks as supporting evidence. This site is independent and is not affiliated with Roblox or Volleyball Game Group.
- Official Roblox game page
- Official Discord discovery page
- Beebom code check
- GamesRadar code check
- Pro Game Guides code check
- Fandom codes reference
- Fandom Yen reference
- MrGuider code and update log
- MrGuider Update 74 recap
- Destructoid code check
- U7BUY code check
- Bloxodes code check
- Fandom styles reference
- Fandom Kumo reference
- Fandom Sanju reference
- Fandom Feiko reference
- Fandom Taichou reference
- Fandom Kijo reference
- Fandom positions and playstyles reference
- Fandom abilities reference
- Fandom Magnetic Pull reference
- Pro Game Guides Magnetic Pull guide
- Fandom pity reference
- Fandom controls reference
- Pro Game Guides beginner mechanics reference
- Pro Game Guides ability tier reference
- Pro Game Guides Feiko reference
- Pro Game Guides Kijo reference
Was this page helpful?
Quick feedback helps prioritize which Volleyball Legends pages need deeper testing, screenshots, or tool upgrades next.
No vote saved yet.
Source check
Spot outdated game data?
Send a short note or image. This page title and URL are attached automatically for review.